Introducing: My New Kitchen!

Tuesday, July 30, 2013

Get your cup of coffee and a comfy place to sit - this is a picture and word heavy post!

First of all before I introduce you to my new kitchen, which is just about ready for move in, I want to say that I consider myself extremely lucky to have a kitchen that is pretty much exactly what I always wanted.  Yes, there are a few glitches that I'm a little disappointed in, but it is a gorgeous kitchen with beautiful cabinets, the most fun barn lights, and is the absolute center of the home.  I do not want to come across like I am bragging - there are far more amazing kitchens out there, but this one is mine and I couldn't be happier.  Let me show you around!


To help orient you to the layout, the above picture was taken standing in the living room.   I absolutely love the center island (Eldon calls it my Command Center!), but it was a great source of stress for me at first.  I had a lot of anxiety over the size of it.  (Just ask my family.) 
That might be due to the fact that when my cabinets were delivered the island was plopped down in part of the living room and made everything around it seem to shrink.  I am not exaggerating when I say that I had to go out of the room and take some very deep breaths to keep from having an all out anxiety attack!


Since the island is sort of front and center I will tell you about it first.  In our house plans the back side of the island was to be a very large raised bar area with stools.  The problem I had with that was that the living room is actually already quite small so I didn't want bar stools taking up any of the space.  Also, the dining room is open right into the kitchen so there is seating right there - it just didn't seem that a bar was necessary.  I came up with the idea to make the back side of the island enclosed cabinets instead of eating bar. 


Because of that decision, I actually ended up with four very large double-door cabinets with the most amazing amount of space. Enough room to buy more dishes!

Also by eliminating the raised bar area, it made the counter top huge.  I'm thinking this will be very fun for large buffet style meals when we have a house full of company!
For a long time I've wanted an apron front farmhouse sink.  I finally got one!  I'm so amazed at how beautiful it is.  We did a lot of debating on whether we wanted it to be an under mount where the butcher block counter tops actually come over the lip of the sink.  I liked it better with the sink about an inch above the counter tops.  As it turned out it was a perfect fit like this so it was an easy decision.

We chose to have a refrigerator cabinet built so that our refrigerator will slide into the space.  The cabinet above the refrigerator is huge and has a very nice shelf, so there will be great storage for the big bulk items and things I don't use too frequently.  On the side of the refrigerator is a can pantry - made just the right size for canned goods.


I love this can pantry.  I've got a good start on filling it with my canned goods from my own garden produce. 
 

Next to the refrigerator all my upper cabinets are glass front doors.  They also have bead board backs stained in a walnut color.  Originally they were going to be bead board painted white to match everything else.  Following the recommendation from a very good friend, I decided to have them stained a dark walnut to match the floor.  I decided that would be a good way to bring the walnut floor up a level and tie it in with the kitchen.  It also brings about a whole different element to the cabinets.
 
 
Below my glass doored cabinets there is a corner door with a lazy susan. 
 
Continuing down that wall there is my little window.  It was not in the original plans and the only way to make it fit without robbing cabinet space was to make it little.  It is the perfect size for seeing out when standing at the stove and it has that nice ledge that Eldon built.  I really love it.   
 

My lovely new Maytag range.  I'm not one to want fancy appliances, but I did research very carefully and took my time making my choices.  In each of the appliances, I had a list of things I wanted and so I focused on making sure I covered those things - anything they had beyond that was just a bonus! I chose all Maytag appliances because I've owned them before and been impressed and because I love that they are made in the United States.  I'll let you know, down the road, how I feel about the choices I made.  Above the stove is my range hood I told you about recently.  I chose to go with white for my appliances - I have a real aversion to stainless steel.  Eldon wanted me to buy stainless steel in the worst way and I just couldn't bring myself to do it.   I will say that I love how stainless looks in other people's kitchens - but I just can't seem to see myself as a stainless steel sort of person! 
 
 
To the right of the stove I had the cabinet shop make this shorter cabinet.  Because I am short I have a hard time rolling out dough on standard height counter tops.  So I wanted a little cabinet with a lower counter top and large drawers for all my baking supplies.  My Bosch mixer will fit perfectly in one of the large drawers.  Those shelves and corbels you see on the counter top?  Those are open shelving that will go on the wall right above this little cabinet.  It will hold all my colorful vintage pyrex, my cookbooks, and numerous other fun things! 
 
 
The view from the dining room. 
(Remember the barn lights with the kinky cords?  We finally removed the plastic sleeves we had put on them and they are relatively straight now!  I love these lights.  Do you notice the bulbs in them?  They are awesome.)
 
 
Looking into the dining room.  Because the dining room is rather small, I gave my daughter my large dining room table and went on the look for a round pedastal table.  I found this antique one in excellent condition with six chairs and two leaves so it will pull out nicely when necessary.  The table will be centered there eventually - right now it is pushed out of the way of the construction zone!  See my Fresh Eggs sign I made?  I have the perfect spot for it - it will be going up soon! 
 
 
So, a few details that I chose for my kitchen. 
 
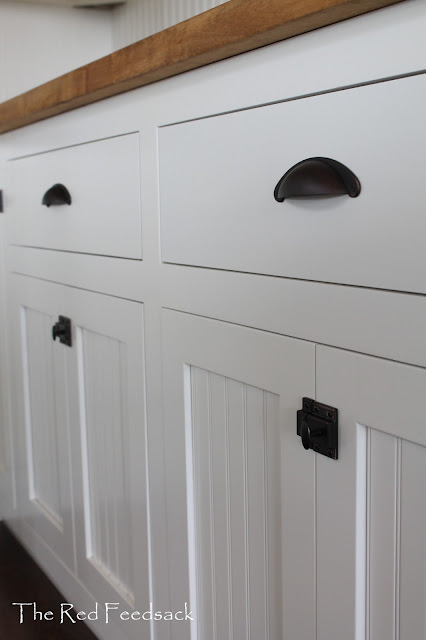
 I love the Shaker style, which is a very simple design without any frills.  All doors and drawers are inset; which means they sit inside the cabinets making the outside flush.  I requested the bead board inserts.  In my search for a cabinet maker I discovered that not all cabinet shops will make the inset doors and drawers as they require a lot more work for them to fit perfectly.   There are lots of changes that occur in the cabinets during delivery, installation and the weight of the counter top so after we completed all that, the cabinet guys came back to adjust all the doors and install the hardware. 

 
My hardware choice was old fashioned latches on the doors and simple drawer pulls on the drawers.   I've always loved the look of latches in old farmhouse kitchens and my heart was really set on having them - that was partly why I wanted the inset doors as latches will not work on any others.  I have to admit that I did get a little worried about the decision of going with latches and (of course) started second guessing my decision.  I follow two blogs that have lovely kitchen cabinets with latches and so I sent an email to both of those women with my questions!  They both wrote me back right away and told me what I wanted to hear:  yes, get latches.  They loved theirs, they had held up beautifully to opening and closing, and they both actually said they never regretted their decision once!  I will tell you that I love them.  Obviously, my cupboards are empty right now, but I love to open and close them over and over!  I chose the color Oil Rubbed Bronze because I wanted to tie in the color of the walnut floors and backs of the cabinets.
 
I also chose all soft close hinges on the cabinet doors (no slamming doors - yay!) and they are so amazing!  The drawers have a soft glide so when you close the drawer it stops about inch from closing and then slowly closes on its on!  They are so awesome.
 
 
We chose all butcher block for the counter tops.  Honestly this was a very big dilema for me.  I did a lot of reading and research and nothing jumped out at me like butcher block.  My daughter has butcher block counter tops in her kitchen so I've had a couple years to observe them and I love how forgiving they are.  I felt that in my farmhouse kitchen where there is a lot of wood in the ceiling and so much white in the kitchen that the butcher block would really add a warmth and would also tie things in with the ceiling.  I could not be happier.  We learned a few tricks when we were installing and I plan to do a post soon strictly about our counter tops; the purchase of them, installation and finishing.

 
 I chose a Porcher apron front farmhouse sink and a Pfister faucet.  I will tell you more details on the sink and faucet when I do the post on my counter tops.  You will find all about why I made the choice I did and how to install them in butcher block!

 
And there you have it.  The view from upstairs!

 
Last, but certainly not least, a big thank you to Phil and Nancy at H&S Cabinets for listening to me, letting me come every few days during construction to watch my cabinets being built and thanks especially to Nancy because she helped me design my kitchen and could "see" what I "saw"! 


Whew.  Long sigh.  That was a long post and I'm sorry - no way to tell you about it in any shorter version!  Thanks for reading.

Too Many Tomatoes!

Sunday, July 28, 2013

 
I really don't have time right now to be picking gallons of tomatoes, much less canning those gallons of tomatoes.  (I know what you are thinking:  "Well then why did you plant such a big garden"?   Believe me, I've been asking myself the same question.)

 
And this afternoon I also picked about 50 jalepenos and green chile.  I'm not even going to mention the green beans, cucumbers, squash and okra that need attention. 

 
Today was the day for tomatoes.  I picked them all and got started out on the porch with my awesome outdoor canning set-up.   Threw those tomatoes in the boiling water til their skin wrinkled up and then I started peeling them. 

 
I cut up some jalepeno, green chile, onion and cilantro.  (The peppers were hot I know, because hours later my hands are still burning!)
 
 
Six pints of salsa all ready for winter!
 
 
I also just diced some tomatoes, quartered others and canned those too.
 
 
I've been thinking about my Mom lately and missing her a whole lot.  She always has shelves and shelves of her beautiful canned goods in her kitchen.  She has one whole corner of huge open shelves that have been there since I was a little girl..  You could say she had open shelving in her kitchen way before it was cool!  So as I've been canning and setting aside for our winter, I think of her. 


Another reason (just another of many) that my mom is on my mind so much is because of this wonderful enamelware that I own.  I use it every single day for one thing or another; but it is fabulous for using in vegetable and fruit prep for canning.   My mother gave me some of these and the rest I've purchased through the years. 
 
 
Guess who was watching me while I was canning on the porch?  Yep, those crazy, inquisitive cows!  (Oh, and the outdoor canning set-up?  Still totally amazing.  I cannot wait to expand on it and really make it awesome next summer.)
 
Lastly, I promise to have a house update this week.   Eldon is multi-tasking many, many things and I am trying to dig deep for some patience as I sand, stain, varnish, sand and varnish again on all the interior doors.  Its a job....  but thankfully the house is small and doesn't have too many doors.  I told Eldon that if we ever have to build another house (please no) there won't be any doors.  (Or walls, or flooring, or trim.  Just beautiful kitchen cabinets.  Are you getting a little curious about those kitchen cabinets?  They are DONE and so amazing.  Can't wait to show you more - but there is a refrigerator sitting in the way of my picture taking right now!) 
 
Have a wonderful week! 


The Gingham Wall - Should It Stay?

Wednesday, July 24, 2013


Do not get all excited.... this is NOT my house.  But, just wondering how many of you saw this beautiful gingham wall in the Southern Living 2012 Idea House?  I fell in love with it right away and knew that I would be painting a wall in my new farmhouse just like this.  So, after thinking about it for over the year we've been building and wondering what wall, I finally decided on the laundry room.   Here's the great "reveal" (smile)! 


What do you think?  Should it stay?  I mean, I know its going to stay for now because honestly, I am way too tired to even think about changing it.  But for the long term?  Still up for debate. 


I've had numerous emails and comments about this wall since I mentioned my progress in a blog post recently.  I have to be honest with you and say that I'm not completely happy with it.  I really wanted it to look exactly like the Southern Living wall!  (Although maybe it does and their photography is out of this world!)  However, I did learn a few things and thought that for anyone else that might want to give it a try I'd share some of my in progress photo's and thoughts.  First of all, I've seen numerous blog post tutorials on this and everyone says it is a two person job.  I'm here to tell you that its not!  And here's how to do it by yourself!


 Start with your wall painted the base color.  I chose Simply White in Eggshell finish by Benjamin Moore. 
Measure your wall vertically and horizontally and determine what size you want your gingham squares to be.  I actually drew out a little grid on paper to give me a clear idea of how it would look. 
 Along the vertical edge and the horizontal edge of the wall, measure and mark your intervals (VERY lightly) with pencil.  I chose 10 inch intervals. 
Then, you need this handy dandy laser leveler.  I didn't have one, but borrowed from a friend that did.  It is amazing and this is what made it a job one person could do without any help. 


Set it up on whatever surface you can find that puts it to the height you need.  I got creative and used all sorts of things!  (See my paint stir sticks?!)


And this is what the light looks like on your wall.  Once I knew it was exactly where I needed it to be then I took my frog tape and taped out a nice line along the the laser light.  Be sure to pay attention to where you will be painting so that you tape outside that area, not inside of it. 

I continued on up the wall, adjusting the laser level as I went.  I also taped X's in the areas I would not be painting so that I didn't get confused and paint in the wrong rows! 


You will need to determine what color you want your gingham to be.  I chose Elmira White in Eggshell finish by Benjamin Moore.  You also need Clear Mixing Glaze.  Mix your paint and glaze like this:  2 parts glaze to 1 part paint.  Now you're ready to get painting.


I used a roller, you could use a brush instead.  When it dried I gave it a second coat.  The glaze gives it a bit of an opaque look and I wasn't sure whether to do a second coat or not.  But I could see the white through it and I just felt like it needed another coat. 


Horizontal stripes complete and tape removed.  I let it dry for about 24 hours at this point.


Next step are the vertical lines.  Do these with your laser leveler too.  It is so nifty - you push a button and it runs the laser light vertically!  Tape it off the same as you did before, being sure to determine your paint rows and tape outside those rows.  I again taped X's in the rows not to be painted.  I painted two coats on the vertical stripes letting it dry thoroughly in between coats and carefully removed the tape.  Luckily the frog tape works very well on projects like this and I had no bleeding of paint. 


And there it is. 

So now, I'll tell you what I'm having a hard time with.  The glaze gives it the opaque look so that when you paint your vertical stripes over the horizontal it gives it the gingham look instead of just a stripey look.  If that makes sense.  I don't feel that mine quite has the gingham look and I think it might be because I painted two coats each direction.  I think it made it too dark.  It seems in the directions that Southern Living provided, they only painted one coat.  I just felt like it looked too blotchy and it was making me crazy. 

So there you have it.  Those are my thoughts on the ginghman wall!  I will say that as soon as we did the flooring and trim, it looked immediately better so I'm hoping once we are moved in and I have something  on the wall, that will help even more! 

Okay, I'm ready for it.  Should the gingham wall stay?

And one last question for you to answer.  What would YOU put on this wall?  Its the laundry room and will get a lot of traffic and visibility as it opens to the back porch, so also acts as a mud room.  There is no room for furniture of any kind.  Simply wall decorations.  I need help decorating - I'm getting close to that point.  Can you believe it? 


July Monthly Moos {Our Farm Story}

Sunday, July 21, 2013

The entrance to our farm
 

This is the story of our farm.   As I've been pondering this blog post,  I keep thinking I need to leave out the beginning of the story, but it's a big part of how we came to the place of buying our farm so I can't really leave it out. 

Our driveway through the woods

It starts like this:  before my husband and I ever got married (31 years ago) he told me he wanted to buy a farm someday.  So, during our first 20 plus years of marriage when he had a good job as a Mechanical Engineer and we were raising our two children, we would talk often of retiring early and buying a farm.   In 2005, when we were just a few years from acting on that dream, the unplannable happened:  I was diagnosed with Breast Cancer.  I was 42 years old.  Our daughter had just married, our son was in his first year of college. 

The first glimpse of our house as you come through the woods.

 
I remember clearly the first words that came out of my mouth when the Breast Surgeon gave me the news.  I said, "My husband and I were going to buy a farm.  I'm afraid that now this will change everything in our lives and we won't be able to buy our farm."  I'm sure he wondered about this crazy woman, but he was kind and said, "Lets just take it one step at a time". 

Our beautiful pond and the main source of water for our cattle.

Fast forward over the surgeries and the chemotherapy to my last check-up with the Breast Surgeon and his words to me, "Dori, it's time for you and your husband to find your farm."  I had actually forgotten my words to him and it tells you what an amazing man he was that he had remembered.

My perfect garden plot at the bottom of the hill.


So... the hunt was on! We had always dreamed of moving to the Southeast and with a daughter and son-in-law in Alabama we decided Tennessee would be the place to start looking.

The first glimpse of the hilltop - notice my husbands smile!
 
Long story short, it was Thanksgiving 2005 that we followed a sign on the highway that said "Farm For Sale" and drove across a pasture, through the woods, meandered up a hill, slowly climbed another hill to the hilltop. 

Thanksgiving 2005 - Our family
(My hair just growing back from chemo!)
 

Our daughter and her husband, and our son were with us and we got out of the car and stood there with our mouths hanging open.  We looked at each other and said, "this is our farm".  And 4 months later, it was!
 
The view north from our house.
 
It was six years, in 2011, before we were actually able to retire and move to our farm, where the work really began!  (If you haven't already read about it, you can read all about our farmhouse progress here.)
 
The view east from our house towards our daughter's house.

During those six years before we were able to move, our daughter and her husband drove out to the farm from their home across the border in Alabama, to hike around and check on things.  It was on one of those trips that the farmhouse they had always admired just down the road, was for sale!  Long story short - they bought it and moved a few years before we did!  We cannot see their house from our farm, but we can see the the red rooftop of their neighbors house! 
 
The view west from our house.
 
 Maybe you can understand why this farm means so much to us.  It was a lifelong dream for my husband, a miracle for me, an incredible and amazing bonus to have our grand-babies just down the road, and it felt like we belonged from the first time we stepped foot on it. 
 
The view south from our house.
 
We love that we have an ever changing view (in every direction) from our house.  We love that we have a taste of the smoky mountains by the "smoke" that rises from the hollows.  We love that we see our cows every day.  We love the friends we've met that, in just two short years, feel like family to us now.  We love living so close to our grown children.  We love everything about being here on our farm....  listening to the birds during the day, the sounds in the woods at night, and how everything grows!  We even love to mow (and mow and mow)!
 
Our driveway coming out of the woods and around the bottom of the hill.  (That dead tree you see there by the road in the woods is going to be cut down soon.  It is massive though and will be a huge job.)
 
Thanks for visiting our farm!