
Nothing ever goes exactly according to plan and some things just simply take a lot of contemplation! This was a common sight - "hmmmm".
After all the trusses were up, it actually took quite a number of days for Eldon to tie them all in and make sure everything was spaced perfectly and in the right spot. He was able to do this by himself so I got a few days off! It was tedious work but vital to the overall finish of the roof.
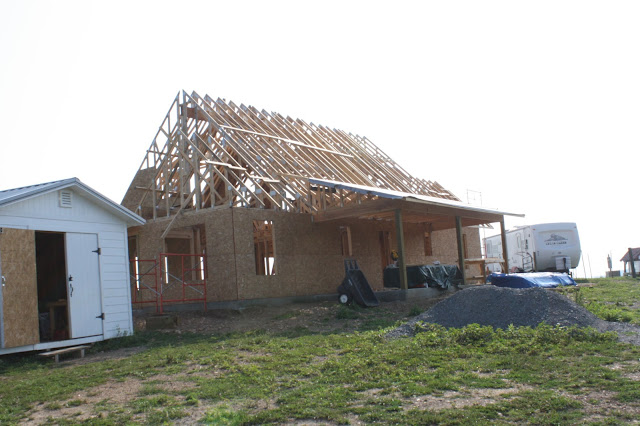

Ready for roof sheeting and exterior sheeting for the upstairs! All I have to say about this is that I was not involved in this part... no matter how hard I tried (and I really did) I could NOT get on that roof. I think it had something to do with the fact that the house is on a steep hill to begin with so it really made it seem high! Or maybe it had to do with the fact that we had Logan (our son) and Justus (our son in law) that live nearby and were willing to give us some time on their days off... so I just enjoyed watching from a comfortable vantage point!

Eldon and Logan starting on roof sheeting between dormers and on gable ends of house - May 2012

Eldon and Justus, going a little higher on the roof sheeting between dormers. Porch roofs all have sheeting - May 2012
While the boys worked on the roof and second floor sheeting I worked on the vapor barrier on the first floor exterior walls. Luckily I had help from Ciara (our daughter in law) but the funny thing is that we had no idea how to do it. And Eldon basically told us to figure it out! So... Ciara did a little research on internet and we watched some YouTube videos and we were off and running! We were paranoid about wrinkles in the stuff so we did a pefectly beautiful job - looked like a pretty wrapped present! (I have since paid a lot of attention to local houses being built by contractors and have seen that their vapor barrier looks like a wrapped present also... but by a 2 year old! So I think we did a pretty good job!). Unfortunately I don't have any pictures of the progress we made.
Sheeting and vapor barrier complete and doors and windows go in.

Still not sure on the exterior door color, but love it otherwise!

A happy day with all the windows in. (The above picture shows the trim around the windows already. Somehow I missed pictures before that step. Believe me, they didn't just magically trim themselves!) You can also see that the roofing paper is on the roof now too - (there are two different colors because there are two different brands of paper!)
Eldon also trimmed out anything that would be alongside the metal roof before the metal went on, so that when I painted I wouldn't have to do it carefully around the metal.

You can see where I've painted the white on the roof trim (and stopped when it got too scary high for me!!)

Logan eventually came to my rescue and painted up to the peak, as well as the dormers!
The roofers came to do the metal roof and I had something going on the day they were here so I wasn't here to take pictures. I thought I'd get some the next day. When I came home they were done! So, no pictures of the roofers in action.
About this time we began the debate of what to use for the porch ceilings. This seems like it should be a simple decision but since the look we were going for was old country farmhouse it seemed like the best thing was beadboard. It would've really been lovely to find some original tongue and groove beadboard from an old house. Instead we did beadboard sheets and then I painted them. It was a really big job to install (hammering upside down) and even more fun to paint (painting upside down)! Here is a before and after picture:

In the "olden" days they painted the porch ceilings a light blue. The story goes that it kept bugs off the ceiling AND it scared off the bad spirits! I really wanted to paint the ceilings blue, just to go with the old farmhouse traditional, but I didn't have the courage in the beginning (more on that later). So, the color I chose was Simply White (a Benjamin Moore color).
After the porch ceilings were up, Eldon started on the siding. We discussed a lot of different options and considered vinyl siding as it is very popular out here. But we decided to go with the James Hardy Plank Lap Siding. We are so happy with how it looks. It was more money and certainly more labor intensive but it is extremely durable and beautiful when painted.

Charcoal grey metal roof, bead board porch ceiling, trim on windows and doors, Hardy plank lap siding. We love it.
Once the siding was up all around the house, Eldon began the tedious process of trimming out the pillars and beams on the porches. In the mean time I was painting, painting, painting!

Siding on house all painted!

This picture shows the beams and the posts with the trim/vineer that Eldon put on. They looked just beautiful after they were painted.

Gable ends with roof vents in, siding complete and painted.

One last thing to mention on this post. About the time I was finishing up with the front porches, Southern Living magazine published an article on their 2012 Idea House and of course it was a Southern house with all the big porches, white siding, black shutters, etc... AND light blue paint on the porch ceilings. It looked so subtle and beautiful that it gave me the courage to paint our back porch ceiling the same color. It is called Window Pane by Sherwin Williams. I love how gorgeous it is. It is extremely subtle and really only shows up in the late afternoon and evening. Maybe you see it in the above picture? I actually wish it was just one shade darker blue so someday I may change it out; who knows?

Outside complete except for a few things: black shutters, door hardware, and painting the dormers (I can't get up there!!) - September 2012
One more post and it should bring us current to where we are now. Thanks for reading along!
To be continued in The House on the Hilltop - Part Five

Eldon and Justus, going a little higher on the roof sheeting between dormers. Porch roofs all have sheeting - May 2012
While the boys worked on the roof and second floor sheeting I worked on the vapor barrier on the first floor exterior walls. Luckily I had help from Ciara (our daughter in law) but the funny thing is that we had no idea how to do it. And Eldon basically told us to figure it out! So... Ciara did a little research on internet and we watched some YouTube videos and we were off and running! We were paranoid about wrinkles in the stuff so we did a pefectly beautiful job - looked like a pretty wrapped present! (I have since paid a lot of attention to local houses being built by contractors and have seen that their vapor barrier looks like a wrapped present also... but by a 2 year old! So I think we did a pretty good job!). Unfortunately I don't have any pictures of the progress we made.
Sheeting and vapor barrier complete and doors and windows go in.

Still not sure on the exterior door color, but love it otherwise!

A happy day with all the windows in. (The above picture shows the trim around the windows already. Somehow I missed pictures before that step. Believe me, they didn't just magically trim themselves!) You can also see that the roofing paper is on the roof now too - (there are two different colors because there are two different brands of paper!)
Eldon also trimmed out anything that would be alongside the metal roof before the metal went on, so that when I painted I wouldn't have to do it carefully around the metal.

You can see where I've painted the white on the roof trim (and stopped when it got too scary high for me!!)

Logan eventually came to my rescue and painted up to the peak, as well as the dormers!
The roofers came to do the metal roof and I had something going on the day they were here so I wasn't here to take pictures. I thought I'd get some the next day. When I came home they were done! So, no pictures of the roofers in action.
About this time we began the debate of what to use for the porch ceilings. This seems like it should be a simple decision but since the look we were going for was old country farmhouse it seemed like the best thing was beadboard. It would've really been lovely to find some original tongue and groove beadboard from an old house. Instead we did beadboard sheets and then I painted them. It was a really big job to install (hammering upside down) and even more fun to paint (painting upside down)! Here is a before and after picture:

In the "olden" days they painted the porch ceilings a light blue. The story goes that it kept bugs off the ceiling AND it scared off the bad spirits! I really wanted to paint the ceilings blue, just to go with the old farmhouse traditional, but I didn't have the courage in the beginning (more on that later). So, the color I chose was Simply White (a Benjamin Moore color).
After the porch ceilings were up, Eldon started on the siding. We discussed a lot of different options and considered vinyl siding as it is very popular out here. But we decided to go with the James Hardy Plank Lap Siding. We are so happy with how it looks. It was more money and certainly more labor intensive but it is extremely durable and beautiful when painted.

Charcoal grey metal roof, bead board porch ceiling, trim on windows and doors, Hardy plank lap siding. We love it.
Once the siding was up all around the house, Eldon began the tedious process of trimming out the pillars and beams on the porches. In the mean time I was painting, painting, painting!
Siding on house all painted!

This picture shows the beams and the posts with the trim/vineer that Eldon put on. They looked just beautiful after they were painted.

Gable ends with roof vents in, siding complete and painted.

One last thing to mention on this post. About the time I was finishing up with the front porches, Southern Living magazine published an article on their 2012 Idea House and of course it was a Southern house with all the big porches, white siding, black shutters, etc... AND light blue paint on the porch ceilings. It looked so subtle and beautiful that it gave me the courage to paint our back porch ceiling the same color. It is called Window Pane by Sherwin Williams. I love how gorgeous it is. It is extremely subtle and really only shows up in the late afternoon and evening. Maybe you see it in the above picture? I actually wish it was just one shade darker blue so someday I may change it out; who knows?

Outside complete except for a few things: black shutters, door hardware, and painting the dormers (I can't get up there!!) - September 2012
One more post and it should bring us current to where we are now. Thanks for reading along!
To be continued in The House on the Hilltop - Part Five
Love love love!! Can't wait to see it in person! You all have worked so hard. The black shutters will look amazing. I can kinda see the light blue on back porch. What a fun idea. Keep blogging lol. I love ya!
ReplyDeleteI am in love! Y'all have done a wonderful job and I am so impressed with the fact that y'all did it yourselves. What a job well done!!!
ReplyDeleteCan't wait to see more. Oh, and the blue is beautifullllll!!!!!
how exciting to see it all come together. lots of hard work!
ReplyDeleteAwesome! Thanks for sharing, so nice to enjoy it from afar. You are working so hard, the "sweat equity" will make it so special & worthwhile. Hardee siding & soffett is the best & will last forever. What a great house!
ReplyDeleteBeautiful house and the setting is gorgeous! The blue ceiling on the porch is so nice. I always wondered why old porch ceilings were painted a different color. Thank you so much for sharing your journey with us. I look forward to more!
ReplyDeleteGORGEOUS! You know I love every little detail...
ReplyDeleteDori! It's Colleen Weeda in Utah. Janell R. told me about your blog. I love your house! It does look like an old farm house and I like old farm houses too! We missed you all at Riverton this year but know you are enjoying your new home/place. Take care...
ReplyDeleteOh Dori I just can't imagine. You really ARE building this yourselves! The progress is remarkable. I am from Ohio and no one up here paints their porch ceilings blue...but I so want to do it. I think that's a project for me in the spring. I can hardly wait to see what you do with the inside! I've subscribed to your blog by email so I won't miss a step. Happy New Year!
ReplyDeleteOh gosh, I just found your blog! How wonderful! Can you tell me where you got your incredible front door? Love it!!!
ReplyDeleteI would have NEVER thought to paint the porch ceiling a different color! Very pretty, we were going to do beadboard for ours but decided on regular tinge and groove, I love it. For now it has no finish, I think we are just going to seal it with poly to keep the beautiful detail of the wood visible.
ReplyDelete