Pages

Friday, April 13, 2012

The Princess Invitation


My grand-daughter, Jillian, is turning four next week and I got the privelege of making the invitations for her princess birthday party.  I thought you might enjoy a little tutorial on the process.  NOT that I am anything special when it comes to paper crafting, but I have to admit that I almost enjoy playing with paper as much as I enjoy playing with fabric!


My daughter picked out the paper.  She knew exactly the look she wanted and she has a great eye for papers that don't really go together, but yet they do. 
 I love the Shabby Chic look paper.


The first thing I did was sit down at my computer and design the wording part of the invitation.  My favorite program for this sort of thing is Microsoft Publisher.  Microsoft Word would work fine but I just love the ease of use with Publisher.  Once I got the wording figured out and aligned the way I wanted it, I printed them up on solid pink cardstock. 


I designed the invitations to be 5 1/2 inches wide by 8 1/2 inches long (so that the folded size would be 5 1/2 by 4 1/2 and fit perfectly in the envelopes I had on hand).  Also, that means that all I had to do was cut the  8 1/2 inch by 11 inch cardstock in half after printing.  Saves a lot of cutting time.  There are many, many paper cutters on the market these days.  But me?  I LOVE my heavy duty old fashioned paper cutter.  I cut all the cardstock in half after printing. 


Because I really like invitations to have a nice crisp fold, I use a little tool that is made just for that (its called a bone folder).  I do not like invitations that are just folded without a crease, they just don't look professional.  So, I placed a nice crease in each invitation and then set them aside.


I measured and cut all my little squares of paper, according to the design that had in my head! 
I set all these aside until I had the number I needed.


I like to ink the edges of paper to give it more dimension.  I felt that these little squares of paper really needed inking.  I'm sure that "real" paper crafters have a much more professional way of doing this; but I just hold the inkpad in one hand and my paper in the other and just run the edges lightly over the ink pad.  Once I had all the little squares inked, I began to assemble.


This picture above really shows how inking the squares brings them to life, don't you think?
Don't be too alarmed if you feel like you smear the ink, or over-ink your paper.  It really
doesn't seem to matter. 


After all the squares of paper were adhered to the invitation, I set them aside. 


I used my Cricut to cut out the glittery princess crown for the front of the invitation.  If you do not own a Cricut, its time you get one! (You can read about them here.)  I love mine.  I feel like paper crafting with the Cricut is a life saver.  The only thing I see as a disadvantage is the cost of the cartridges; however, every one that I own I was able to buy on ebay for a very good price. 


The cartridge I used is called Once Upon A Princess and I love the crown with the
cut out number inside. 


I adhered a little scrap of paper behind the number so that when it was attached to the invitation the number 4 would really stand out.


I used pop dots at a few points on the back of the crown to cause it to really "pop" when placed on the invitation.  It really gives it a 3D effect.  (Unfortunately, on the invitations we mailed we didn't use the pop dots, the thickness can cause problems when they run through the postal machines.)


And there it is!    The perfect invite to the Princess Party! 


Sharing at these fabulous link parties:
It's OVerflowing


"My entry to Uncommonly Yours link party @ Uncommon sponsored by Appliances Online and the Bosch Washing Machines."


Tuesday, April 3, 2012

Picture Board Tutorial


I promised you a tutorial to make the picture bulletin boards.  Here it is!


Here is everything you need to buy, find in your craft box, or if you're like me its usually
 a little of both:

Cork Boards (mine were 12 inches square)
Spray Adhesive
Ribbon
Fabric remnants
Measuring tape
Pinking shear scissors (or you can use regular ones)
Glue gun and a few extra glue sticks
Button cover kit


I really, really like feedsack fabric; whether it is the real deal vintage or the reproduction.  
 I used some reproduction feedsack fabric that I've had for awhile.  I also just used some of the ribbon that I had on hand. 

Step One:

Measure your cork boards and add about 1 inch all the way around; this is the size you
will want your fabric to be. 

Measure and cut your fabric.  I used pinking shears because I like the finish look they give.  (Not that you can see it as these will be on the wall, but oh well I still like the finished look!)

Iron your fabric nice and smooth.


Step Two:
Spray your cork board with spray adhesive.  (Be sure to do this outside - this stuff is a big mess if you get it on things you don't want it to be on!)
Lay your cork board on the wrong side of your ironed fabric.  Flip it over and smooth out any wrinkles.  The adhesive is pretty forgiving on the cork board.  You can pull your fabric off and put it back on if you have wrinkles you can't smooth out.   (Sorry I don't have a picture of this!)


Step Three:
Turn your cork board over, fabric side down, and using your glue gun proceed to bring the fabric to the back of the board and attach with the glue.  I did the sides first and then the corners.  Before gluing your corners, do a little experimenting on what way works best for you in folding and gluing the corners down.  You can hold it with your fingers and flip over the board to see how it looks.  Be prepared to burn your fingers a bit on this step!  (At least I always do!)


Step Four:
Now flip your board back over with your fabric side facing you.  You can experiment a bit here with the placement of your ribbon, how close you want them to be to each other.  You will also want to have at least an inch of overhang so be sure to cut your ribbon long enough.  Once I determined
my placement I actually measured with my measuring tape and made little marks with a
 pen for placement.  It helped a lot. 
I only used a tiny dab of glue right over my pen marks just to hold the ribbon in place.  I then flipped my board over and glued the ribbon piece securely to the back.  The goal here is not to use much glue on the front of the board, as you don't actually want your ribbon glued (so that you can slip pictures underneath when you are finished).   Be sure to place ribbon going both directions as you want to create a diagonal pattern  (you can see this in one of the pictures later in this post).


Step Five:
This is my very favorite part of the whole project!  Making the fabric covered buttons.  If you've never done this before you will be amazed at how easy and fun it is.   You can buy a simple little kit for just over a $1.00 at Walmart and that is for 5 buttons.  I used a total of 16 buttons on this project (4 for each board). 
I won't give you instructions for that process here as the package comes with great instructions.  Just follow them and you'll have the most darling buttons ever! 
It takes a bit of time to do this, so make yourself a nice cold drink and prepare to enjoy this step.  (See my cherry lime-aide in the background?!  You can find my recipe here!)


Don't you agree they are just so darling?  I think I would just like to have about 100 of them in a mason jar and set them on my counter top and look at them all day!  (If you didn't want to take the time to make the covered buttons, you could use regular buttons or if you have a stash of vintage buttons on hand this would be a great way to use and display them.)


Step Six:
Once your buttons are all covered, all you have to do now is glue them on at the points where the ribbon crosses.  I also put a dab of glue underneath the ribbon so that it really secures it to the fabric.  That way when you slip your pictures under the ribbon there is something to keep them in place. 


You are done!  Now you can attach to the wall and slide in all your special pictures.


I love having pictures of my favorite people as well as a little I LOVE YOU  note from
my precious grand-daughter!

Hope you enjoyed the tutorial and I look forward to hearing how yours turn out!


This week I'm linking to these fabulous parties:

It's OVerflowing

Sunday, April 1, 2012

My Coffee Spot


Living in a travel trailer can be very challenging when it comes to space. In the corner of the "living room" we have a great little (ugly) corner cabinet that is meant for a television. Well, seeing as how we do not watch television I ended up using this empty corner as a catch-all. It was driving me crazy. I recently decided it would be a perfect Coffee Spot.   Here is my redo!

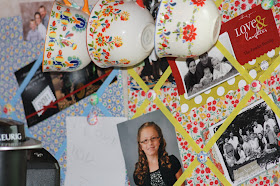
This is what the cabinet looked like before I did anything.  See what I mean by ugly?  One thing I had a lot of that I had no where to display were snapshots of friends and family.  I decided to make some fabric covered bulletin boards and put them on the wall in here. 


These were the first two that I made.  I love vintage feedsack fabric so that is what I used in different bright colors.


These were the other two I made.  There was only room for the four of them. 


Once I got them up, I could finally picture in my mind a little Coffee Spot!  I attached all my photos of special people,  set up my coffee pot, hung my Anthropologie cups that I think make coffee taste so amazing, my special cookbooks, my ceramic basket for tea bags, and a few other things and it was perfect.  I love my little corner Coffee Spot!


One thing I've learned since living in a travel trailer is that we only have room for the things that warm our heart and make us happy.  Anything that doesn't fit that bill gets put back in storage (or in the trunk  of my car til I can get to our storage unit!).  Having all my special colorful things around me has really made living in such tight quarters not so bad!  (On a side note - the exterior walls are up on our house and we've begun on the interior.  There is hope for a house in sight!)


If you are interested in making the fabric covered bulletin boards, I will post a tutorial here in the next few days.  It is a very simple, cheap project with very cheerful results! 


This week I am linking up with the following fabulous parties!


Lil\'Luna