Pages

Tuesday, February 24, 2015

February Monthly Moos {It's A Magical Place}


Winter and ice hit in our Tennessee hills and oh my word has it been cold.  


I really try not to complain about the weather, because I do love living where we have seasons.  But I also think if I get one more winter storm alert on my phone, I'm going to cry!  


It's the ice that just amazes me, having never really been around it before.  The danger of it seemed very real when I was standing on the porch shivering but enjoying the glittery ice in the trees when I heard the most horrifying cracking noise and realized a tree was falling somewhere.  


My first thought was that I need to make sure I stay out of the woods during this ice storm.  But then I remembered I have to drive through the woods to get off the farm.  Hmmm.  Well, I guess I'll just stay on my hilltop!  And that's pretty much what I did for about forever, it seemed like.  


I did bundle up to go out and check on the cows and calves a couple times each day.  Not that they really need to be checked on, but I can't stand it if I don't!  And of course, Belle can't stand it either.  It's kind of our daily routine!


And we do have calves.  Darling, precious, perfect little black calves.  Oh how I love them.


If you owned some of these darling things, you'd brave the ice, wind, falling trees and blowing obstacles for just a few minutes of pure farmgirl joy wouldn't you?  Even if it meant putting on overalls, heavy coat, gloves, face fleece, hat, a heavy pair of wool socks and boots?  And still coming home cold?  


But, it's a magical place here on the farm.   I wouldn't want to be anywhere else.  


Wednesday, February 18, 2015

Final Details In The Guest Bathroom!


I think I mentioned last week that I'm finally doing some final touches around my house.  I feel like we've lived in it long enough that I'm starting to know what it is lacking to making it feel more cozy and lived in.  


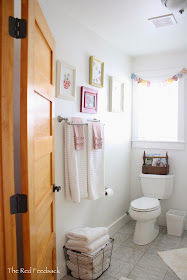
I wrote a post a number of months ago about an embroidery project I was working on (you can read it here if you missed it) and I sort of left my readers hanging about what I was going to do with it.   My plan was to place each of those embroidery "pictures" in a pane of the window.  This was going to be hung in our guest bathroom.  


Well... it did not work the way that I envisioned it.  It was a little busy on the eyes and a little too much for the small wall in the guest bathroom.  So, I set them aside and did some thinking.  Recently I was back to the drawing board.    I purchased some frames in different colors, sizes and styles and framed the embroidery and hung them up.  


I am just totally happy with how they look in the bathroom.  I also really like how they look in the different frames.  


I've had those hung for a few months and just felt like I was still missing something.  There is one small window that could certainly be livened up with a curtain, but I just didn't feel that I wanted a curtain on that window.


I had a brainstorm to make a little Bunting out of the some of the same feedsack fabrics that I used in my embroidery pictures.  


I pulled out a few of my feedsack fabric scraps.  Aren't they just gorgeous?


I made myself a little Bunting pattern and got to cutting.  (Of course the easiest way to do ANY kind of a fabric project is with a self healing matt and a rotary cutter.)  I didn't take pictures of the sewing... but I just sewed two pieces right sides together, leaving the top open.  I turned them right sides out, ironed them carefully.  Then I used double fold bias tape to sew them into a bunting.  A very quick and simple project.


And they are so cheerful and happy hanging in the bathroom window!    These also give a nice accent to the window!


I also made another one to hang over the mirror.  Because this mirror has a nice "top" to it, you don't lose any of the mirror surface by having a Bunting hanging on it.  


A friend that was visiting recently said to me, "The fabric on those embroidery pictures just speaks to me".  It is funny, because that is how I've always felt about the feedsack fabrics.  


So you can understand why I smile when I walk in this bathroom now!  Not because it is anything special, but because the cheerful feedsack fabrics are speaking to me!


I talked about this bathroom a bit when we were still in the construction stages.  But I don't think I've actually shared it since we moved in.  I really do love the vanity that we had custom built to match the Shaker style cabinets that are in our kitchen.  I painted this one myself and I do like the light yellow color and the latches.  


I tiled the floor myself and although there were some imperfections (a few of the tiles don't match up exactly), you wouldn't notice now unless you were actually looking.  I've accepted the imperfections and I don't get so frustrated when I see them anymore.  But I am still standing firm on the promise that I will never lay tile by myself again.  


So, there it is.  One more room in the house just the way I pictured it!  

So, now in case you ever wondered where I came up with the name The Red Feedsack for my blog you know that it is because I love the feedsack fabrics and when I was contemplating different names, I knew I needed a name that was me!   Somehow it just fit.

Hope your week is going well and you are staying warm.  We've had some very cold temperatures here in Tennessee with schools and businesses closed because of ice.  I have just enjoyed the excuse to stay home and not go anywhere!  


Wednesday, February 11, 2015

Barn Room Update!


It has been a bit of a surprise to me that it would take over a year before I really felt like our new house became a home.  It's not like I didn't know every single nook and cranny of it after working on it for a year and a half!  


I really love my upstairs Barn Room/Craft Room.  It is open to the downstairs so I never feel isolated or separated from the rest of the house.  I think that is partly why my grand-girls love it up here so much - they are never shut off from the rest of us!


I have recently been working on finalizing a few details in it that have finally made it exactly how I pictured it in my mind, only better!  


If you read my original Barn Room post here, I told you about the built in's that we did into the walls between the dormer windows.  (There is only one dormer window in the Barn Room, the other two are over the Living Room.)  I hated the wasted space that was being closed up in those walls, and so Eldon framed them so that we could eventually build shelving.  So, finally we had time to get that project done and I love it.   These are open shelves in the READ part of my room and the way the walls slant down in the built in's, the two bottom shelves are very deep.  I actually have books stacked two deep in that part.  


It creates a great library area with the old couches that I've had forever.  We sit here a whole lot.  When we have company, they inevitably end up here!  


I told you earlier this week about the old cedar chest that I refurbished (here) and put in the dormer window area.  I took the above picture with my cell phone yesterday when Jillian was here for the night.  She loves the window seat.  I found her here over and over the last couple days!  So I think it is a big hit!


In the CREATE part of the room instead of open shelving in the built in, Eldon built shelves inside and then put on doors so that I can hide all my crafting junk!  


On one side he built shelves very spaced out so that I can put my sewing machine, serger, and other large bulky crafty things.  


The other side still holds my paper crafting cabinet; however, I am on the hunt to replace this mess with something a little better.   (I'm open to suggestions)  Mostly, I love that I can close the doors!


I still have my old dining room table up here because it fits, it is great for crafting and sewing on, it also serves as more eating area when we have a house full of company.  (Which we have had numerous times and I'm so glad I can say, "All the kids can take their food upstairs to the table up there!")


My daughter and I were recently given a bag of quilt squares that were purchased at a garage sale.  We looked them over and I stuck them away for a project.  I was thinking I really wanted to brighten up the slanted wall areas (since it is just about impossible to hang pictures or anything on a slanted wall) and I was thinking a Bunting would work.  I remembered those quilt squares!  So this Bunting project literally turned into a 30 minute project by folding them in half and sewing bias tape along the top edge to join them all together.  


I really love how bright, cheerful and lively it makes the room.  I was pretty sure when Eldon saw it he would say, "It looks like a Circus in here".  So, I waited for days and finally I asked him what he thought and he was confused.  He hadn't even noticed it!!  That made me laugh!

So now, to answer a few questions that I get in emails quite frequently.


What do we think of our floors?  

I love, love, love these floors.  If I could have them throughout the entire house I would.  They are easy to clean, they hide dust and dirt, they give a very warm feeling, and they just go with everything.  Which is surprising because they are sort of a grey/blue color.   They are called Dunes Bay Driftwood from Lumber Liquidators.   


How have my ironed on to the wall letters held up and do I like them still?

I really love my letters.  They have worked very well on those crazy slanted ceiling/walls and they haven't even remotely begun to peel off.  However, because I have had so many people email me and ask if they really can be peeled off without ruining the sheet rock and paint finish, I did remove one of the letters to test it.  And YAY!  No problems at all.  They are a great way to brighten up a room.  (You can read the post I did about them here.)


Where did we get the art work on the back wall and what is it actually?

I never even thought anyone would notice this art work, much less ask about it.  We were looking for something "barn-ish" but, well.  You guessed it... with color.  Eldon was the one who found these prints on internet.  We bought the prints and I framed them.  They are basically Farmyard Folk Art and very fun!  You can go to the website here.  The Artist is Walt Curlee and the prints we purchased are:  Shucking and Storing Corn,  Taking Pumpkins To Market, Cultivating The Peas.  He has all sorts of others that are just as fun.  


How do we feel about the pine plank ceiling?

The wooden plank ceiling is the best thing ever.  I hate sheet rock.  I mean I seriously HATE it.  If I could do it over I would have NO sheet rock in my house.  So, that is probably one of the reasons I love the wooden plank ceiling!  But this is the disadvantage to it.  Because it is real wood (not MDF) and it is pine, the knots have bled through the paint and are a pine/yellow color. Probably I should've sealed it first and then painted with an oil base.  I still could do that.  But, oddly enough, I sort of like the knots and things showing through.  So for now I've chosen to just leave it.  


Am I going to paint the ugly book shelf?

Just kidding.  No one asks me that but myself.  The problem is this.  This bookshelf was made by Eldon's father about 60 years ago.  I sort of hate to mess with it.  BUT, it has some structural work that needs to be done (see how it is bowed in the middle?) and Eldon really wants to fix it.  So... I suspicion I will paint it at that time.  For now, it works.  And I really, really love how useful it is.  (Don't open the doors... things fall out!)


And finally... my next project that I have cut out for me.  My stair wall.  I've been looking at this for 2 years now.  Even before we finished our house I was wondering about this wall.  I have some really great visions in my brain for an awesome gallery wall.  BUT, I don't want the generic gallery wall.  I 
want it a little vintage and fun. 


 But it is front and center in the living room which I've kept a little sedate.  So, it's time to get with it and figure it out!  I'll keep you posted!


Monday, February 9, 2015

Refurbishing An Eighties Cedar Chest


Can you believe that after moving almost four years ago (and living in our home for a year and a half now) I just about finally have everything out of storage and put away?  There were so many things that I had moved, put in storage... and then when our house was finished, they either didn't fit or my style had changed so much I really didn't want them!


This cedar chest was one of those things.  It was a high school graduation gift to me from my parents in 1980!  And now, it basically was trash.


The wood was scratched, stained, and just overall disgusting.  (I'm almost embarrassed showing these pictures!)


The padded cover was rotten and ripped and of course very "eighties"!


I just about set it on the roadside for someone to pick and refurbish.  And then I thought, WHAT?  I can refurbish it myself!


It definitely is a solid chest with a beautiful cedar interior and everything that was broken on it I figured I could repair.


In thinking of a color to paint it my daughter suggested Annie Sloan Paris Gray.  After a little thought I decided she was right as I could brighten it up with pillows.  (I also figured it would look good with the gray floor and I was right.)


After cleaning up the wood a bit outside I carried it upstairs and got started painting.   (I did it very late at night so I didn't even try to take pictures of the process.)


There was a point where I was very unhappy with it, but that is one thing I've discovered about Annie Sloan paint (at least for me).  Every project I've ever done with her paint, there is a very fine line between "Oh yuck, I can't stand this" to "Oh.My.Word.  This is going to be gorgeous"!


Usually it is the dark wax that does the trick for me.  That's when I begin to love the result.


I dug through my fabric scraps and covered the top in new foam and this gray striped Duck Cloth.  I just love how it came out.  


Then I did some more digging in my fabric scraps to cover some huge pillows I had and pulled out these two fabrics that don't really go together... but yet for me, they do!


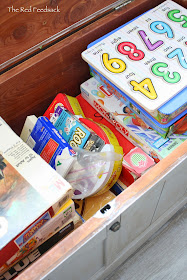
I scrubbed the interior, put new screws in the hinges and filled it up with all our games.  They fit perfectly.


I moved it into the dormer window of my craft room and was immediately so happy.  It just belongs there!  It works as a window seat for looking out to see who is coming up the road.  Or to just watch the cows walking by in the woods below.


Or for the grand-girls to recline with a book.


Final verdict on the cedar chest?  I'm so happy I didn't leave it on the roadside!


P.S.  Eldon finished the shelving and doors in my built-ins and I finally pulled together a few other details in my craft room.  More on that in a few days!