Pages

Friday, January 23, 2015

January Monthly Moos {We've Got A Winner}


Three years ago on Martin Luther King day our first calf was born on our farm (to us anyway) and we named her Holiday.  


She was a sweet calf and very nice looking so we saved her as a replacement heifer.  When she was two years old we bred her to our bull, McKinley.


She turned three years old last week... and this week she had HER first calf!  


She's shaping up to be a very good Momma, her baby was cleaned up and nursing within minutes of its birth!  

It was an exciting day on the farm.  The successful birth of a calf from a first time Momma, plus the fact that the Momma was born right here on the farm.  

I'd say the new baby is a Winner indeed.  


Oh, yeah.... a winner.  You're waiting to hear who the winner was of the Milk Cow Kitchen book right?  

HEATHER S is the winner!

Thanks to all who commented!

If you missed any, you can read all my past Monthly Moos posts here.


Monday, January 19, 2015

Home-Made Cards {Tutorial}


Back in November I wrote a post here about making and sending home-made cards.  I've had quite a few comments and emails from readers wanting to know if I would write a tutorial on card making.  


Let me just say that I am the last person that should be telling you how to make cards.  I have some really, really creative friends that do some amazing things in the card making department.

But...  I do love making them.  And, for myself, I've learned a few things that make it fun, quick and easy.  So here we go!  


First of all, I have a card making box where I keep all my supplies.  These are separate from my other paper crafting, scrap booking supplies because when I am in the mood to make cards, I want to be able to just grab my stuff and get started.


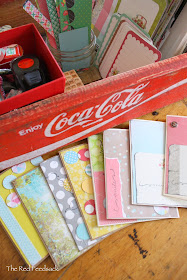
I use a vintage Coca Cola crate.  It fits in my cupboard, it has handles, it holds all my supplies.  Plus it is cute.  And cute is important right?  


So here are some of the things I have found that work good for me.  

First of all I buy all my supplies from Hobby Lobby.  Partly that is because I have one close by.  Also, they have their scrapbooking supplies 50% off about every other week.  If you need something today and don't want to wait for it to go on sale, you can download a 40% off coupon to use when checking out, right from your smart phone .  However, you can buy supplies wherever you prefer to shop for your paper crafting things.  


I think it is worth every penny to buy a value pack of blank notecards and envelopes.   The cards are scored for folding, they have matching envelopes and they are the perfect size.  They also come in all colors; I prefer white, ivory, or the craft paper type.  


I kind of have the personality that I get bored using the exact same paper for every card, so I never purchase full sheets of paper.  I find that my favorite thing to keep on hand are the Paper Pads.  They come in either 5 x 5 or 6 x 6 in a lot of different styles, colors and designs.  They vary in how many pages are in a pad but typically there are about 25 to 35 sheets.  They typically cost about $5.99.


And of course you want to have plenty of tape!   I purchase the pack of 4 glue runners because I always like to have plenty on hand.  Believe me, my grand-daughters can use up one these in about 30 minutes if I'm not watching!  :-)  


Then the rest of the supplies are up to your personal preference.  I love different paper punches, but right now my favorite are the circles.  You'll notice in the picture above that I punched circles out of my paper scraps and just sewed them together.  I love doing it like this.  It makes it fun to cut them to size and use them in all different ways.  


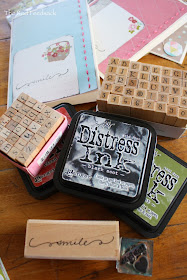
 I keep several different colored ink pads and a favorite stamp, and also some letter stamps.  Those really come in handy.


I don't use a lot of embellishments on my cards, but I do love Washi tape, buttons and brads, and I really love doing a little hand sewing touch with embroidery thread.


One of my favorite things to use to embellish a card or just add a simple little message are journaling cards.  My favorite are the ones above made by Becky Higgins for her Project Life line.  Hobby Lobby carries these.  They are about $7 but there are 60 cards and I never use a full card.  Usually I cut them in half, or just use a corner.  So they can be used for a whole lot of cards.

Now that you have all your supplies together, just start cutting and glueing paper to your blank card.  That is all there is to it.  One thing that I do not do is spend a lot of time on a card.  I make it from start to finish in less than 5 minutes usually.  My paper isn't straight or lined up perfectly.  I just eyeball things and glue them on.  


I do love sewing on cards, either by hand or with my sewing machine.  It is super quick and I think gives it kind of a unique look.  


The cards above are very basic.  A piece of paper cut and glued on.  A journaling card cut to size with a little black ink smeared on the edges, and glued on.  And then a little hand embroidery.  Literally a few minutes and it is complete.  


The fun thing about some of the paper packs is that there are usually pages with lettering or a message of some sort.  It really makes it easy to make a card then.


The little letter stamps are nice for writing your own message.


Very simple, very fast.  I think the key is to remember that perfection isn't required.  A very simple card can be just as beautiful as one that takes an hour to make.  Also, I like to make mine all different just because that is my personality.  But, since they are obviously not going to the same person you can make them all exactly the same and that would be very fast.  


I've discovered that the key to sending a note to someone when you think of them, is having cards made up in advance.  So when you are thinking of someone it isn't hard to jot a note and stick it in the mail.  I have mine all ready with the return address on them, as well as a postage stamp.  No excuses that way!

So, there you have it.  

Now, a CHALLENGE!  We all love them right?  Make your cards, email me a picture and I'll do a follow-up blog post in about a month featuring everyone's cards.  (Tip:  think Valentine's cards!)


Happy Monday!

P.S.  If you haven't entered my give-away here, you still have time.  Deadline is this Friday!

Thursday, January 15, 2015

A Give-Away Book... And A New Look!


I have to tell you about my new favorite book,  Milk Cow Kitchen.  This book is written by MaryJane Butters...  The MaryJane that publishes MaryJanesFarm magazine and other things.  This is no skinny little book... it is 400 pages that hold your interest on Every.Single.Page.  


It is a cookbook, but not only a cook book.


It's full of all the ins and outs of making your own ice cream, yogurt, butter, cheeses, sour cream... but not only that.


It's beautiful photography, awesome stories, fun cow decor ideas, farm tips (like how to tie a hitchin' rail knot).


It's got sweet stories and pictures on cowgirl romance...


...and milkmaid fashion.  I'm not kidding you, there are step by step instructions on how to comb your hair in the milkmaid look!


I tried to do my grand-daughter Jillian's hair in milkmaid fashion but we only had time for a very quick practice run.  But she loved it, so did I, and we'll be doing it again soon!  (I also tried combing Rosy's hair in the same way, but she's only 3 and her hair was a little too fine to stay in place.  It really upset her.  She said, "But I'm a Farmgirl too"!)


This book has absolutely every pointer you could ever need about purchasing, owning, and caring for your own milk cow.


It's one of those books that is so much fun to read because even on the pages with recipes, there are tidbits of information that you never knew!  And some very neat quotes and sayings.  Every page is a surprise.


And one of the best things of all?  I think I have a Milk Cow Kitchen because this book looks awesome in it!  (Smile!)


 I've had it on display in my kitchen for a couple months and everyone that walks in, picks up the book, takes a glance inside and then heads to the recliner to read it.  It is that good.


You remember that I'm the Ranch Farmgirl blogger for MaryJanesFarm?  So, I asked MaryJane if she would send me a book for a give-away here on my blog.  And YAY!  She had it in the mail for me before I could blink.


So, in celebration of a new look to my blog, a new year, and new ideas....  I've got an awesome give-away for you!  It's a beautiful autographed copy of Milk Cow Kitchen from Mary Jane!


In case you are thinking that you don't want a milk cow, won't ever have a milk cow, or aren't interested in a milk cow....  please enter this giveaway anyway, because I PROMISE you that you'll love this book.  (And you'll want a milk cow after reading it too!)


All you have to do to enter is leave a comment here on my blog.  Just any ole comment will do.  It doesn't have to do with milk cows, cook books, or my new blog design... (but I'd love your input on that, by the way)!


This giveaway is open until next Friday - January 23rd - and I will ship priority to any address in the United States.

Good luck, and may the best Milkmaid win!  (That would be you!)

P.S.  If you are posting anonymously, please leave an email address so I can contact you if you win!

Sunday, January 11, 2015

A Vintage-look Andy!


Ever since my kids were little toddlers, which is about 28 years ago, I've made Raggedy Ann and Andy's for them and for all the special little kids in my life.  


I've made them for nieces and nephews, my best girlfriends children, my grand-daughter and a few on commission.  

(I actually have a box that says "Raggedy Ann and Andy Hospital" and it, unfortunately, is full of numerous dolls in need of repair.  They have the owners names pinned to them:  Matt, Andrew, Emily, Carol Kay, David .... etc!  Dolls that are about 20 years old that I need to repair and send back to their original owners, now some of them parents themselves!)


The pattern I use was my mothers, McCalls 6941.  It is the pattern she made dolls for each of us four kids when we were little.  I think my mother has our dolls in her cedar chest.    

Although my pattern isn't in as good of condition as the picture I pulled off of internet!  Mine is tattered and torn and written on by my daughter, Andrea, when was five years old and wrote on  everything!  


It is a very sweet little pattern full of wonderful details.


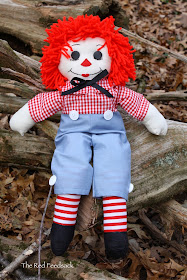
I was commissioned to make this little Andy for the grandson of my dear friend.  

(Remember Grant?)


The hair is the trickiest detail.  I've never been very good at it.  But the key is to make it really full and thick.  When I was in New Mexico in November, my Mom worked on his hair for me and then I finished it up by adding a lot of thickness!  I was happy how this one came out, with his cute little Sailor cap.


I do love the handwork required in this pattern.  I did a little looking at all the newer Ann and Andy patterns.  First of all they are hard to find and I noticed that nothing is hand sewn.  Most of them are painted.  I just love the hand sewing.  I even love the button eyes.  I think a lot of people worry about children pulling the eyes off and swallowing them.  I guess that is the world we live in.  Incidentally, all of the Ann and Andy dolls in my "hospital" still have their eyes!  It is the hair and clothes that is missing!


He's just a darling little vintage look doll.


I loved wrapping him up all pretty for Christmas and  sending him to Grant.


And from the picture his Mommy texted me, I think Grant loved getting him!


I'm excited for this new year - I've got some fun projects planned and a few changes coming to my blog.

 And later this week, I've got a really exciting give-away planned here on my blog!   Be sure to come back in a few days - you won't want to miss your chance to win!  

(And it's not a Raggedy Ann or Andy, sorry!)


Friday, January 2, 2015

The Garage {Slash} Shop Is Finished!


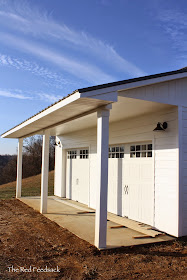
Our garage/shop is finished!  I hesitated to even write this post as we've had nothing but rain which results in a very muddy hilltop that is not at all pretty right now.  But it is a very exciting event to have Eldon's shop finished so I thought I would share it!  


This is the view as you come up our driveway muddy road to the back of our house and the garage.  The next big job awaiting us in the Spring is our landscaping, building a yard fence, putting in a cattle guard and building the rails, etc. on our back porch.  I can hardly wait!  Luckily I have a husband that loves to work right?


We really love the way the garage came out.  I wanted to go the easy route and have metal siding.  Eldon insisted on it matching the house and having the Hardy Plank siding.  Wow, am I happy he won that argument!  It looks really nice.


We painted it the same color as the house, put on the same color metal roof, built the porch the same and....


... even did the same beadboard ceiling on the porch that we did on the house porches!  


Here is the view from the other side of the hill.


I really love the inside.  It is definitely Eldon.  He put sheet rock on the ceiling and this awesome wood on the walls.  It gives it a nice wood smell and looks very masculine!  This is the side of the garage where we'll be parking our boat.  You didn't think we'd be parking CARS in here did you??!!  (Smile)


The art on the walls is compliments of our son who is an Aerial Lineman and works off of a helicopter platform.  He found these vintage pictures from the company that he works for and they gave them to him.  They are a fun addition to the walls.  


And the wood stove is the greatest thing ever!  That means he can work out here in the freezing cold weather conditions!  And I can bring my cup of coffee and sit by the fire and talk about the next project!


Custom work benches and table on the other side of the garage.  This is the shop part.  The place to work on projects.  The table can be moved out of the way if Eldon needs to bring a vehicle in to work on it.  (Yes, he does that too.)


At the  end of the work bench is an old roll top desk that is solid wood and weighs a million pounds.  We moved it from Utah, have had it in storage for 3 years and I refused to put it in the house.  Eldon said he'd make use of it in his garage!  It's funny because it actually looks pretty good!  


Then the other end with the carriage doors.  I helped Eldon install those things and it was an interesting job.  But we got them in and they work!


I love that we have attic space to store our camping gear and things.  The little pull down ladder is awesome.  Our grand-girls think it is amazing and I'm glad that when it's folded up into the ceiling they can't reach it!  (And the boat barely fit in its half of the garage!)  


It's the perfect attic space, with a light and windows on each side.  

I'm so glad that Eldon has his "space" back!  I know how much I hated not having my Craft Room.  It's kind of a fun place to hang out and I'm thinking I may have a few projects to do out here too.  (I imagine permission will be necessary first!!)  

Hope your New Year is off to a great start.  We started ours out with our kids all home and it was so special to have a house full of family, laughter, and craziness!