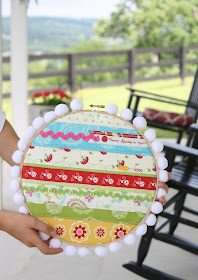
When I see projects that use pieces of scrap fabric, you can believe that I take notice. And if they are super easy... I definitely take notice! I decided to share a quick little tutorial with you on this super fun and fast Hoop Art project!
The supplies you will need are:
sewing machine
fabric scraps of all widths, but at least 12 inches in length
quilt batting, about 13 inches square
fabric scrap about 13 inches square for the backing
buttons, rick rack, lace, pompoms or any other trim and accessories
glue gun
ten inch wooden embroidery hoop (or the size of your choosing)
Cut your fabric scraps into varying widths and about 12 inches in length. The widths should be no wider than 2 inches. I used seven different fabrics on mine.
Lay out your fabric strips in a pattern that is pleasing to you and then sew them right sides together until you have them all sewn together. Press the back with all the seams going in the same direction and then press the front so that it lays flat.
Make a quilt sandwich by layering your square fabric backing (right side down) and then your quilt batting and finally your sewn strips (right side up).
Pin your layers together so they keep things smooth and even.
Quilt your fabric by sewing a 1/4 inch away from each of the seams.
Lay your wooden hoop on top of your little mini quilt and experiment with different buttons and trim pieces until you get the look you are happy with. You can use a glue gun to attach your buttons and trim or you can sew them on. Get creative and have fun. (Notice that I used some of the selvedge from MaryJanes Caravan Roundup fabric line and look how cute it is!)
Once all your buttons and trim pieces are attached, place your little quilt in the hoop, tighten it up tight and then trim off the excess fabric.
Finish your Hoop Art by glueing pompoms to the outer edge of the wooden hoop. (Or feel free to finish it in some other way.)
Your simple project is finished and ready to hang!
If any of you follow me on Instagram (@redfeedsack) you know that I've been teaching a Summer Quilting Camp to five girls! It has taken a tremendous amount of my time with prep work between classes as well as teaching the class. But guess what? Each of the girls made a quilt from start to finish and I am so beyond proud of them I can hardly contain myself. The above picture is the five quilts completely finished by each of the girls. I am eager to share the whole story with you! Watch for it next week!


Cute project...cute fabric! Wow...what satisfaction to see those quilts completed by your students.
ReplyDeleteJob well done!!! Such a cute and fast gift or to treasure for yourself💕😊.
ReplyDeleteI'm looking forward to your Quilt Camp stories. I'm just bowled over at what those girls made. They had a wonderful teacher. 😉😘
Such happy colors and patterns:). I have a couple of hoop embroideries that my mom made with trim around them too. How wonderful to quilt with your Granddaughters, happy memories for all:).
ReplyDeleteKathleen in Az
Dori, where do you find your beautiful material? I loved all the quilts that the girls made, you are a wonderful teacher.
ReplyDelete